Burstcoin Software
Burstcoin software is developed by talented programmers who are active in the Burstcoin community. As you may know from reading about Burstcoin’s history, its core blockchain technology is impressive. Building upon this core, these applications bring its impressive capabilities to real-world business and contribute to real-world consumer adoption.
Please note: New users should review the guide entitled «Getting Started with Burstcoin» before installing or using any Burstcoin software.
All-in-One Software
BTDEX - Software package including basic wallet functionality, plotting, mining, and a decentralized exchange. Multilingual.
Wallet Software
Phoenix - Burstcoin's light node wallet, use in combination with the Burst Reference Software for full node functionality.
Phoenix is the newest and easiest wallet to install. As a light node wallet, it references the blockchain through copies that are stored on network nodes rather than its own copy. It can, however, reference a local copy of the blockchain in combination with the BRS software. With the BRS software running, just select settings and enter http://localhost:8125 as the node. Phoenix is a cross platform application and can be installed on all major operating systems.
- Main Developer: Burst Apps Team (BAT)
- Github repository: https://github.com/burst-apps-team/phoenix/releases
- Platform: Windows, MacOS, Linux, iOS, Android
A multi-platform application architecture is made possible through a few key front-end technologies: React Native, Angular, and Electron. By using these technologies in conjunction, Burst wallet developers will enjoy a modern application development workflow without sacrificing the quality of the end-product. See SIP-18 for more information.
Burst Reference Software - Windows - Full node functionality - Use with the included wallet interface or with the Phoenix wallet.
This software connects to the Burstcoin network as a full node. It supports a multitude of database back ends. H2 database is included by default.
- Main Developer: Burst Alliance
- Download link: https://www.burstcoin.community/wp-content/uploads/2021/01/burstcoin-2.5.4.zip
- Platform: Windows
- GitHub link: https://github.com/burst-apps-team/burstcoin/releases
Installation Guide: Following is a guide for installing the latest BRS software for Windows including instructions for operating the wallet as a full node.
Please note: Although the installation instructions are quite long, many of the steps are completely optional. Synchronization with the blockchain is the most time consuming individual step. Because of this, if your frequently reset your regular computer using the factory image, your may want to install the BRS wallet on a dedicated computer or 64 bit tablet so that your work is not lost each time.
System requirements:
- 64 bit version of Widows
- 64 bit version of Java (Java 8 recommended): https://www.java.com/en/download/
- Web browser capable of downloading and installing 64-bit java. Browsers that work well include: Google Chrome, Edge, and the ESR version of Firefox. The regular version of Firefox is not supported.
- Sufficient disk space for the full blockchain (~8Gb or so)
- The ability to leave your computer up and running for several hours in order to allow the full blockchain to synchronize.
Preliminary installation instructions:
- Verify that that your computer meets all of the system requirements, including correct Java version.
- Download the latest version of BRS (zip).
- Extract the contents to a location of your choice.
- In the conf directory, create a copy of the brs-default file and rename it brs. (both files will have a «.properties» extension)
Installation using the included default H2 database (the easiest option). Optional: To use MariaDB rather than H2 (not generally recommended) proceed to the alternative instructions.
- Run the burst.exe file.
- Follow prompts to allow the installation program to make changes to your computer.
- A window will appear with scrolling data show installation progress and the blockchain downloading. May take several hours depending on internet connection and processor speed.
Start your wallet
- Click on the button marked «Start Wallet». It may take several minutes for this button to become operational.
- Your new wallet should appear in a browser tab.
Log into an existing account or create a new account.
To log into an existing account, enter the passphrase associated with that account and press enter.
To create a new account, click the link that says «DON’T HAVE AN ACCOUNT, CLICK HERE TO CREATE ONE». The wallet will generate a passphrase of 12 words. WRITE THESE WORDS DOWN AND DO NOT SHARE THEM. This passphrase is your private key. It is required in order to access your wallet and Burst funds. Please review the security sections of the getting started guide for information on securing your Burst (see front page). Follow the confirmation step on the next page and click Next.
You should now see the wallet dashboard. The display of your balance and transaction details will update as the blockchain synchronization progresses.
Re: Full Nodes
Running a full node is one of the most important ways to support the Burst network. Full nodes maintain a complete copy of the blockchain and allow peers to connect in order to synchronize. This contributes to the decentralization that is required for a crypto currency to operate successfully. Lite wallets and clients do not maintain a complete copy of the blockchain and therefore cannot contribute to decentralization as effectively. Although BRS is intended as a full node capable wallet, running a full node is completely optional.
Earn NDS-A rewards when your full node operates to current qualifying standards. Please note: Reward amounts and qualifying standards such as wallet version and uptime percentages are subject to change and are set by the program operators (currently the Burst Marketing Fund).
To earns NDS-A rewards, open the brs.properties file located in the installation folder under «conf» (use note pad if a program is requested). Locate the following items, set the values, and then save and close the file. You will receive rewards in burstcoin anytime your node qualifies.
- P2P.myPlatform = Add your Burstcoin account number using the Reed Solomon Address Format (example: BURST-NMEA-GRHZ-BRFE-5SG6P).
- P2P.shareMyAddress = Add YES
Verify that your full node is operational.
The BRS wallet includes UPnP (universal plug and play) and should operate as a full node automatically whenever it is running and port 8123 is open (externally accessible). To verify that port 8123 is open, enter 8123 into this open port checker and click «check». You can find your external IP address (ex. 193.182.13.162) by clicking on this external IP address checker.
If port 8123 is open, wait a few hours and then verify that your full node is operational by locating your external IP address in this network explorer. As a new node, it will initially appear near the end of the list, and then move up the list as time passes. You can verify you participation in NDS-A award program here by checking the NDS-A column. If your external IP address appears in the explorer, everything is setup correctly and you can disregard the remainder of this installation guide.
If port 8123 is closed (not externally accessible), proceed to the section titled «reserve a static IP address for your computer» and «Configure port 8123 to allow port forwarding».
Reserve a static IP address for your computer. (This prevents IP addresses from changing and negating port forwarding rules when a computer is restarted.) Please note: If you prefer to use the alternative method of port forwarding know as DHCP Reservation, skip this section.) <span< p=»»> </span<>
- Open a “Command Prompt” by typing CMD into the Windows search field and clicking on «Command Prompt»
- Type “ipconfig” and hit enter
- Locate and record your “IPv4 Address”, «Subnet Mask» and “Default Gateway”.
- Open “Control Panel”, “Network and Internet”, “Network and Sharing Center”, “Change Adapter Settings”.
- Right click your internet connection method (wi-fi or ethernet) and select «Properties».
- Remove the checkmark next to “Internet Protocol Version 6 (TCP/IPv6)” if present.
- Add a checkmark next to “Internet Protocol Version 4 (TCP/IPv4)” if one is not there already.
- With “Internet Protocol Version 4 (TCP/IPv4)” selected, click on “Properties”.
- Select “Use the following IP address”.
- In “IP address” type your computer’s IPv4 address.
- In “Subnet Mask” type your computer’s «Subnet Mask».
- In “Default Gateway” type your computer’s «Dafault Gateway».
- Select “Use the following DNS server addresses”.
- In “Preferred DNS server” type “8.8.8.8”.
- In “Alternate DNS server” type “8.8.4.4”.
- Check “Validate settings upon exit”.
- Click “OK”.
- If you receive a warning about “Multiple default gateways” select “Yes”.
- Click “Close”.
DHCP Reservation. This is an alternative method for reserving a static address IP address. If you followed the steps immediately above, skip this section.
These step would only be followed if supported by your router.
- Navigate to “Connected Devices” (terminology for your router may be different).
- Click on the device that you are using to run your node.
- Select “Edit”.
- Change configuration to “Reserved IP”.
- Verify that the IP is the same one you set in port forwarding.
- Select Save.
Configure port 8123 to allow port forwarding
Configuring port 8123 would only be necessary if any of the following are true:
- Your external IP address as found here ( external IP address checker ) does not show port 8123 as open here ( open port checker ).
- Your external IP address does not appear here ( network explorer ) within 3 hours.
- Neither «UPnP Mapping successful» or «Port was already mapped. Aborting test» can be found in the burstcoin GUI.
Open your internet router’s settings by entering your default gateway into your browser’s URL field and hitting enter. Most ISPs have a default username and password combination. If you do not know the login information, check for it on the side of your modem, locate it using an internet search, or contact your ISP. If the login information has been changed previously and you cannot locate it, you will need to do a factory reset of your router. Please note: This recommendation does not contemplate the extent of your computer network setup. Resetting your router may require you to redo your network setup. For most users and for those who do not have an extensive computer network, this should not be a problem.
Please note: although port forwarding is a standard and common configuration, different modems may have different terminology and steps to effect this change. It is not possible to provide the exact steps for each modem. It may be necessary to reconcile the exact terminology and steps in order to effect the change from a closed port 8123 to an open port 8123. If the following guidelines do not seem to make sense for your particular router, you might contact your internet service provider (ISP) for support.
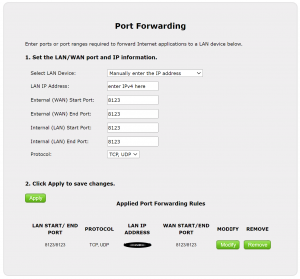
Find the “Port Forwarding” option (may be under a «firewall» or «Advanced» tab) Please note: “Port Forwarding” and “Port Triggering” are NOT the same. See Figure 1 below for an example of the port forwarding screen for an Actiontec T3200. This area will be similar for many modems.
General settings: Most modems will need only these 3 items. You may be asked to enter these directly or to add a service with these setting and activate the service in a separate step.
- IP address: Enter your IPv4 IP address manually, or select it from a drop down menu if one is available.
- Internal WAN Start port, External WAN End port, Interal LAN Start port, External LAN End port: Set all to 8123. There will be either 2 or 4 such entries to make.
- Protocol or Service Type: set to use TCP and UDP.
Some modems may ask you to add a «service» or a «rule» to be configured as above but activated in a separate step.
Additional items that you may encounter depending on your router include:
- Enable?: Indicate «yes» by checking a box or making a selection.
- Common Service: Use «Other»
- Service or Rule Name: Use «Burstcoin»
- IPv6 Address field: The item can be ignored.
You are now finished. Close out of network settings.
After a few hours check again to see if the your setup is correct by locating your external IP address in the explorer network status.
Example of the port forwarding section for an Actiontec T3200 router: IP address redacted, should be your IPv4 IP address.
Optional - Additional instructions for using MariaDB rather than the default H2 database - advanced users only.
Installation using MariaDB (try this if you experience issues with H2, for more advance computer uses, linux machines with MariaDB already installed)
- MariaDB knowledge base: https://mariadb.com/kb/en/documentation/
- HeidiSQL documentation: https://www.heidisql.com/help.php
- Download and install MariaDB: https://downloads.mariadb.org/
- The MariaDb installation will ask to set up a password for the root user. Open the
brs.propertiesfile created previously and locate the following section: DB.Url=jdbc:mariadb://localhost:3306/burstdatabaseDB.Username=rootDB.Password=YOUR_PASSWORD- Replace «YOUR_PASSWORD» with the password for the root user.
The MariaDB installation will install HeidiSQL, a graphical user interface (GUI) tool used for MariaDb administation.
- Use it to connect to the newly created MariaDb server and create a new DB called ‘burstwallet’.
Alternatively, you can use the following commands to create the database using the console to connect directly to mysql: If you have already created the database using HeidiSQL or are not comfortable working in the console, skip to the final step in this section.
mysql -u root -pCREATE DATABASE burstwallet;
Create a user to be used by the wallet to access the database. Replace
CREATE USER 'burstwallet'@'localhost' IDENTIFIED BY '';
Grant this user all privileges for the database burstwallet.
GRANT ALL PRIVILEGES ON burstwallet.* TO 'burstwallet'@'localhost';
Run burst.cmd in the Burstcoin folder.
Return to the Windows Installation Guide and continue with the section titled «Start your Wallet» to finish any steps that may be applicable.
MacOS
System requirements:
- OSX 10.10 or higher
- Sufficient disk space for the full blockchain (~8Gb or so)
- The ability to leave your computer up and running for several hours in order to allow the full blockchain to synchronize.
Preliminary installation instructions:
Note: A simple bash script is available to complete all of the steps for you if you prefer using a script. Simply download a .zip of the code located at https://github.com/beatsbears/macos_burst and follow the directions in the README file. If you prefer to execute each step without using a script, continue the process below.
- Download the latest version of BRS.
- Extract the contents to a location of your choice.
Install Homebrew
Homebrew (brew) is an excellent package manager for MacOS. To install, open a new terminal and run the following command. You may be asked for your password.
$ /usr/bin/ruby -e "$(curl -fsSL https://raw.githubusercontent.com/Homebrew/install/master/install)"
If you already have brew installed, make sure everything is up to date by entering
$ brew update
Install MariaDB
MariaDB knowledge base: https://mariadb.com/kb/en/documentation/
$ brew install mariadb
Start MariaDB and create a user for the wallet
$ brew services start mariadb
Log into MariaDB to create a new wallet database and add a user to manage it. Your MariaDB server may not have a root password set. Consult google for instructions for setting a new root password.
$ mysql -u root -p -h localhost
While logged into MariaDB, execute the following SQL commands:
CREATE DATABASE burstwallet; CREATE USER 'burstwallet'@'localhost' IDENTIFIED BY '<YOUR PASSWORD>'; GRANT ALL PRIVILEGES ON burstwallet.* TO 'burstwallet'@'localhost';
If these commands executed successfully, exit the MariaDB console by typing q and hitting Enter.
Install Java 8 SDK
Brew gives you the latest version of all packages, but the latest version of Java may not work without issue. You can install the latest verified version (Java 8) by following these steps.
Install brew cask.
$ brew tap caskroom/cask
Use brew cask to install a specific version of a package.
$ brew cask install java8
Add password to the nxt.properties file
Locate and open the conf directory in the location where you unziped the installation package.
Open the nxt.properties in a text editor.
At the end of the file, add the following lines which tell Java where to find the MariaDB database. Replace <YOUR PASSWORD> with the password created previosly.
nxt.dbUrl=jdbc:mariadb://localhost:3306/burstwalletnxt.dbUsername=burstwalletnxt.dbPassword=<YOUR PASSWORD>
Start the wallet
In your terminal window verify that you are in the same directory as the burst.sh startup script. If you run ls in your terminal window you should see a response similar to the following:
Slow-Air:burstcoin-1.3.6cg andrewscott$ 1s
Burst_Wallet.url burst.sh html
MIT-license burst_db lib
burst.cmd conf
burst.jar genscoop.c1
In your terminal window, use the following command to verify that your permissions will allow you to execute the startup script.
chmod +x burst.sh
Launch the wallet script. You will need to leave this terminal window running until the full blockchain has synchronized. This could take several hours or days depending on your processor speed and internet connection.
./burst.sh
You should see a lot of output flying by as the wallet starts up.
Create your account or sign in with an existing Burstcoin Account.
Verify that it is running successfully by entering the following in your browser’s URL field:
“https://” “localhost:8125/index.htm”
Your wallet should appear.
Note: The blockchain may take several hours to download
References:
- https://www.reddit.com/r/burstcoin/comments/7lrdc1/guide_to_getting_the_poc_wallet_running_on_a_mac/
- medium.com/@aclaytonscott/burst-part-2-macos-wallet-setup-tutorial-2822bb029f5
Docker
- Docker
- Docker-Compose
System requirements:
- Sufficient disk space for the full blockchain (~8Gb or so)
- The ability to leave your computer up and running for several hours in order to allow the full blockchain to synchronize.
Prerequisites:
Database:
- Docker images for BRS version 2.3.0 with MariaDB (recommended)
- H2 Database are available at Docker Hub (alternative)
MariaDB
Use the following docker-compose.yml file to run BRS with MariaDB database in containers. Note: Indentation levels are 2, 4, and 5 characters.
version: '3'
services:
burstcoin:
image: pocconsortium/burstcoin:2.2-mariadb
restart: always
depends_on:
- mariadb
ports:
- 8123:8123
- 8125:8125
mariadb:
image: mariadb:10
environment:
- MYSQL_ROOT_PASSWORD=burst
- MYSQL_DATABASE=burst
command: mysqld --character_set_server=utf8mb4
volumes:
- ./burst_db:/var/lib/mysql
Save and run the file.
docker-compose up -d
With the -d flag, both containers are started as background processes. A burst_db folder will be created in the directory of the docker-compose.yml file, if it was not created before. This folder is mounted to the MariaDB storage and holds the Burstcoin database containing the blockchain. The containers can be stopped and removed at any time via docker-compose down. With the next start, the burst_db folder will be mounted again and your previous blockchain status will be loaded.
H2
H2 can be used as an alternative to MariaDB. Because it is an embedded database, it does not have to be run it in a separate container.
Run the following command:
docker run -p 8123:8123 -p 8125:8125 -v“$(pwd)”/burst_db:/etc/burstcoin/burst_db -d pocconsortium/burstcoin:2.2-h2
“$(pwd)”/burst_db is the path to the folder which is mounted to the H2 storage. If it does not exist, a new burst_db folder is created in the current directory.
Custom configuration
To use a custom configuration, mount a folder containing the brs-default.properties and the brs.properties to the /conf mount point.
Linux - Ubuntu/Debian installation
Requirements:
- Sufficient disk space for the full blockchain (~8Gb or so)
- The ability to leave your computer up and running for several hours in order to allow the full blockchain to synchronize.
Make sure your installation is up to date apt update && apt upgrade
Install the latest version of Java: apt install default-jre-headless -y
Download and extract the latest version of BRS it to your preferred location. In the conf directory, make a copy of the brs-default.properties file and edit it to suit your needs. Otherwise, the brs.properties will with defaults.
In the folder where you extracted the zip file contents, run the following: java -jar burst.jar
To run without the GUI (logs, percentage of blockchain synchronization, etc.), run as java -jar burst.jar --headless.
Installing MariaDB (alternative)
To use MariaDB as an alternative to the included H2 database (store on folder burst_db), use the following procedures in addition to the procedures above. (Stop BRS from running before proceeding).
Install MariaDB:
apt install mariadb-server
During installation you will be prompted to enter a password for the root user. Enter and remember this as we will need it later.
Create a database(brs_master), user (brs_user) and assign a password to the user by running the following command:
echo "CREATE DATABASE brs_master; CREATE USER 'brs_user'@'localhost' IDENTIFIED BY 'yourpassword'; GRANT ALL PRIVILEGES ON brs_master.* TO 'brs_user'@'localhost';" | mysql -uroot -p mysql -uroot -p < init-mysql.sql
This will prompt you for the password you entered for the root user when installing mariaDB
Configuring BRS to use MariaDB
Navigate to the conf subdirectory within your BRS directory:
cd BRSWallet/conf
Create a brs.properties file inside the conf folder:
nano brs.properties
Add the following lines:
DB.Url=jdbc:mariadb://localhost:3306/brs_master DB.Username=brs_user DB.Password=yourpassword
Run BRS again:
java -jar burst.jar
You will see something similar to the following output:
Nov 29, 2018 4:28:33 PM brs.Burst loadPropertiesINFO: Initializing Burst Reference Software (BRS) version 2.5.0Nov 29, 2018 4:28:33 PM org.ehcache.core.EhcacheManager createCacheINFO: Cache 'account' created in EhcacheManager[INFO] 2018-11-29 16:28:33 brs.db.sql.Db - Using mariadb Backend
Note: If closing the terminal or pressing Ctrl-c, the node will shutdown:
[INFO] 2018-11-29 16:53:12 brs.Burst - Shutting down...
Configure BRS to run as a service/daemon
Closing the terminal or pressing Ctrl-c will close the software. To avoid this, BRS should be run as a service. It is particularly helpful if you run BRS on a linux system using SSH.
If systemd isn’t installed on your system, run the following command:
sudo apt install systemd
Then, you will have to create a new service file for BRS:
sudo nano /etc/systemd/system/brs.service
Add the following configuration (replace description, Exec, WorkingDirectory and User according to your setup):
[Unit]
- Description=BRS Wallet
- After=network.target
- Wants=network.target
[Service]
- ExecStart=/usr/bin/java -jar /home/burst/burst.jar
- WorkingDirectory=/home/burst/
- User=brs-mariadb
- Restart=always
- RestartSec=90
[Install]
- WantedBy=multi-user.target
Enable the service:
sudo systemctl enable brs.service
Start the service:
systemctl start brs.service
Get service status:
systemctl status brs.service
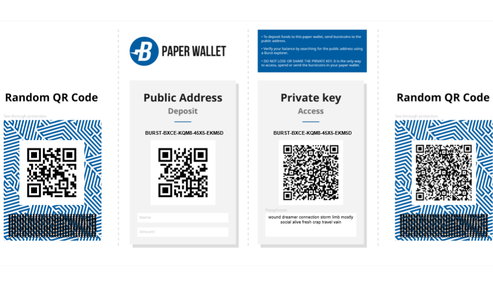
PaperBurst
PaperBurst is a paper wallet generator for Burst.
- Main Developer: Umbrellacorp03
- Download link: https://github.com/umbrellacorp03/PaperBurst/releases/tag/1.0
- Platform: Windows
Guide:
This tool is can be used to generate a new wallet or can be used with an existing wallet.
Paper wallets can be used to transfer funds using public keys, or as a reference document for cold storage (the funds are still on the blockchain, but the paper document provides the required access information).
In order to use the tool, populate all of the required fields and then click on the desired button. The paper wallet will output as a printable .pdf file.

Phoenix Mobile Wallet
Convenient light-node wallet for mobile phones and other Android devices.
- Main Developer: Blankey 1337
- Download link: https://play.google.com/store/apps/details?id=com.burstcoin.phoenix&hl=en_US&gl=US
- Platform: Android
HotWallet
A light-weight version of the current BURST wallet for easy access to send and receive BURST.
- Main Developer: Zoh, Burst Applications Team
- Download link: hotwallet.cash
- Video Guide: https://www.youtube.com/watch?v=V-1TC3NcMME&feature=youtu.be
I18N – Internationalization (mobile wallet)
The major part of the wallet localization is done via a .json file containing definitions for text strings used in the wallet. The naming is such, that a 2-letter code denotes the language. en.json is the source file (see below).
If you want to translate this file into some language, you need to translate the “Create New Account”, “Done” etc. not those in ALLCAPS. A major constraint is, that the translated text not only be correct and stylistic, but also of about the same length as the original content. It can be shorter, but not much longer. The 2-letter language code is ISO 639-1
en.json localization file
Plotting Software
Engraver (recommended)
«POC 1, POC 2
Engraver is a BURST plotter that natively generates optimized plot files. It generates PoC2 files and is intended to work on most platforms. BURST’s fastest plotter, it features: direct and async i/o, SIMD support (sse2, avx, avx2, avx512f), and gpu support.
- Download link: https://github.com/PoC-Consortium/engraver/releases
- Platform: 64bit only!
Basic Instructions for Windows:
- Create an empty folder to hold your plot files on your local system or external drive. Do not use spaces. Example: E:\PlotFiles or E:\Plot_Files
- Download and unzip the latest version for your operating system. Open the unzipped folder and double click on the Engraver application (EngraverGUI). Follow your system’s prompts to install.
- In the application, enter account’s numeric id, found in the upper left corner of your wallet. (Note: This is not the account address which begins with BURST)
- Output Folder: Browse to the folder that you created to hold your plot files.
- Start Nonce: Use the default of zero if plotting for the first time. Otherwise, click on «auto from last file» and browse to the last plot file that you created so that Engraver can determine the starting nonce for a new plotting session automatically.
- Size to plot: Choose «maximum» to fill your disk’s available space with individual plot files of a specific size. Choose «value» to create a single file of a specific size. Each nonce will use 256 KB of disk space. Performance is no affected by the file size chosen, but dividing your plot files into several smaller files can be beneficial if you need to move them at some point, or if you need to delete a portion of them to free up space for another purpose later.
- Click on Start Plotting. Allow the plotting session to finish. Depending on the amount of plots that you create, this process can take hours or days. It can be interrupted by clicking on «Stop Plotting» and resumed later.
Notes:
- To choose between using your CPU or GPU and to set limits on the of memory and cores used, make selection in the advanced settings tab.
- Avoid overlapping plot files (duplicates). Consider your starting nonce numbers carefully. Duplicate plot files waste space that could be used for unique plots. Duplicate plot files are of no value.
Following is a guide for those who prefer to compile software from source code.
Engraver - How To Compile From Source
https://www.youtube.com/watch?v=hRuF0hn-A4k
Credits: Sphinxicus
Description: Engraver is the reference Burstcoin (or Burst) cross-platform plotting software created to further improve and optimize Burst plot file creation.
The following steps are to install Engraver 2.2.0 by compiling from source on a fresh installation of Debian Linux version 9 «Stretch». Please be sure to check Git Repository for the latest release before proceeding.
Note: Commands to be entered into the shell will be formatted in bold text, e.g.:
date
example command outputs will not be bold, e.g.:
Wed 28 Nov 12:02:18 GMT 2018
Prerequisites
Before you begin the installation, the following packages need to be installed:
- curl
- git
- build-essential
Change to root user:
su
Enter root password
Install curl, git and build essential packages:
apt install curl git build-essential -y
Once the above packages have completed installation, its time to install Rust.
Installing Rust (Stable)
To install Rust, run the following command:
curl https://sh.rustup.rs -sSf | sh
You will be presented with three options (see below):
Current installation options: default host triple: x86_64-unknown-linux-gnu default toolchain: stable modify PATH variable: yes1) Proceed with installation (default)2) Customize installation3) Cancel installation>
Choose option 1 to install
Once installation is complete, follow the instructions to configure your current terminal sessions’ environment variable so that you can run Rust related commands:
source $HOME/.cargo/env
To confirm the installation of the correct channel of Rust, type the following:
rustc -version
This should give you the output below:
rustc 1.31.0 (abe02cefd 2018-12-04)
Obtain the source files
To download the source files from the Git repository, run the following command, (please make sure to check the exact path to the latest version) :
git clone https://github.com/PoC-Consortium/engraver
This will download and extract the files to the engraver sub directory (from where your present working directory is)
Compiling the source files
Navigate to the engraver directory:
cd engraver
build the application:
cargo build -release
Running Engraver
Once the above has completed, navigate to the executable:
cd /target/release
From here you can run engraver and begin plotting. Example command:
./engraver -n 1000 -id 12345678912345678912 -path /home/burst/Burst -sn 0
To understand the complete range of flags/options available for the engraver application, please read the Wiki page on GitHub.
TurboPlotter 9000
POC 1, POC 2
TurboPlotter 9000 is a CPU/GPU PoC 1 + PoC 2 plotter and plot integrity checker.
- Main Developer: Blackpawn
- Download link: https://blackpawn.com/tp/
- Platform: Windows, MacOS, Linux
Note: TurboPlotter 9000 is free to use. However it is not open source.
Mining Software
Scavenger
Scavenger is a burst miner written in Rust. It features direct io, avx512f, avx2, avx, sse, and opencl.
- Main Developer: PoC Consortium
- Download link: https://github.com/PoC-Consortium/scavenger/releases/latest
- Download link: https://github.com/PoC-Consortium/scavenger/releases/tag/1.7.6
- Platform: Windows, MacOS, Linux, Unix (64 bits)
Note: Use Version 1.7.8 for pool mining only. For solo mining, use Version 1.7.6.
Basic Instructions for Windows:
Note: Plot files are a prerequisite for Burstcoin mining. If you have not already created your plot files, see the plotting software section of this library.
Download and unzip the latest version for your operating system. Open the folder and double click on the Scavenger application. Follow your system’s prompts to install.
- Optional: Double click on the Scavenger application file to test the installation using the included test data.
- Optional: Make a copy of the included config file (file type is YAML) in the same directory. This is helpful for trouble shooting later if needed.
Add your configuration details: With scavenger closed, open the config file. ( It will likely open in notepad. )
- For pool mining: Comment out the 1st 3 lines by inserting a hash symbol ( # ) at the beginning of each. These lines are not needed for pool mining.
- For solo mining: Replace the data on these lines with your account’s numeric id and passphrase. Comment out any these lines that are not used.
Add the path to the folder which contains your plot files under plot_dirs ( plot directories ).
- Replace test_data with your path. Example: E:\burstcoinplotfiles
Add URL:
- For pool mining: Replace the sample URL with the URL obtained from your mining pool. If a port number is used, append it to the end of the URL separated by a colon. ( Example: URL:8080 )
- For solo Mining: Replace the sample URL with: http://localhost:8125
The remaining items are default and advanced settings that you will not likely need to change. Save and close the config file.
Double click on scavenger to begin mining.
Notes:
- If changes are made to the config file while Scavenger is running, Scavenger must be restarted in order for the configuration changes to take effect.
- «HDD, wake up!»: This powers-up your hard drive anticipating a new round so that your deadlines can be submitted as soon as possible after a round starts.
- To verify that you are mining successfully on a pool, look for your miner on the pool’s website. It should show your miner and mining share.
- To verify your reward assignment setup, locate the reward assignment transaction in your wallet and verify the details listed.
- Reward assignments become effective after 4 confirmations (4 blocks), This takes an average of 16 minutes.
- If your mining pool does not list block winners, you can find blocks that you won in a block explorer ( see online services ).
For more detailed instructions: See https://github.com/PoC-Consortium/scavenger/wiki
GYRA ( a front-end tool that creates formally valid and logically consistent configurations for Scavenger )
Gyra is a front-end tool that creates formally valid and logically consistent configurations for the Scavenger Proof-of-Capacity miner. The configuration file used by Scavenger and created by Gyra is a .yaml file, which users can download in their browser and save it in the root directory where the Scavenger executable is placed.
-
Main Developer : feyd27
-
Source Code : https://github.com/feyd27/gyra
-
Download link : https://gyra-for-scavenger.firebaseapp.com/config
-
Announcement : https://www.reddit.com/r/burst/comments/cuzect/gyra_for_scavenger_a_submission_for_the_2019/
-
Platform : Cross Platform
Scavenger - Compile from Source
https://www.youtube.com/watch?v=Zmk3-w9EhFE
These instructions are only for those who prefer installing Scavenger by compiling from source.
Description
Scavenger is a burst miner developed by the PoC Consortiun and written in Rust. If features direct io, avx 512f, avx2, avx, sse and opencl support. At the time of writing this is the preferred miner of choice for both CPU and GPU mining.
The following steps are to install Scavenger 1.6.4 by compiling from source on a fresh installation of Debian Linux version 9 «Stretch». Please be sure to check Git Repository for the latest release before proceeding.
Note: Commands to be entered into the shell will be formatted in bold text, e.g.:
date
example command outputs will not be bold, e.g.:
Wed 28 Nov 12:02:18 GMT 2018
Prerequisites
Before you begin the installation, the following packages need to be installed:
- curl
- git
- build-essential
Change to root user:
su
Enter root password
Install curl, git and build essential packages:
apt install curl git build-essential -y
Once the above packages have completed installation, its time to install Rust.
Note: The features used when compiling Scavenger are not available on the stable release channel of rust, therefore the nightly channel needs to be installed.
Installing Rust (nightly)
To install Rust, run the following command:
curl https://sh.rustup.rs -sSf | sh
You will be presented with three options (see below):
Current installation options: default host triple: x86_64-unknown-linux-gnu default toolchain: stable modify PATH variable: yes1) Proceed with installation (default)2) Customize installation3) Cancel installation>
To install the nightly channel chose option 2, this will ask you additional questions, answer as per below:
Q: Default host triple?A: Press enter to leave unchanged
Q: Default toolchain? (stable/beta/nightly/none)A: nightly
Q: Modify PATH variable? (y/n)A: y
You will be presented with a summary of the current installation options as per your answers provided above:
Current installation options: default host triple: x86_64-unknown-linux-gnu default toolchain: nightly modify PATH variable: yes1) Proceed with installation (default)2) Customize installation3) Cancel installation
Chose option 1 to install
Once installation is complete, follow the instructions to configure your current terminal sessions’ environment variable so that you can run Rust related commands:
source $HOME/.cargo/env
Switching from Rust (stable) to Rust (nightly)
If you chose to or already have the stable channel of rust installed you can switch channels by using the following command:
rustup default nightly
To confirm the instalation of the correct channel of Rust, type the following:
rustc -version
This should give you the output below, note the «nightly» present (version correct at time of writing):
rustc 1.32.0-nightly (6bfb46e4a 2018-11-26)
Obtaining the source files
To download the source files from the Git repository, run the following command, (please make sure to check the exact path to the latest version as this will change as later versions are released) :
wget https://github.com/PoC-Consortium/scavenger/archive/1.6.4.zip
This will download the file 1.6.4.zip to your current directory.
Extract the contents of the zip file:
unzip 1.6.4.zip
This will create a new directory named scavenger-1.6.4.
Compiling the source files
Navigate to the scavenger-1.6.4 directory
cd scavenger-1.6.4
At this point it is worth deciding what you are going to use to do the mining, CPU/GPU and also what instruction sets are available on your device. See the README.md file located in the scavenger-1.6.4 directory for an overview of features to use.
In this example, a CPU with the SSE2 instruction set will be used therefore the simd feature option is required (the same would work for AVX, AVX2 etc). Run the following command to compile the code:
cargo build -release -features=simd
Post compiling steps
Copy the scavenger executable to the scavenger-1.6.4 directory (two levels up in this case). This placed it in the same directory as the config.yaml file which is required for it to run.
cp scavenger ../../scavenger
Navigate back to your scavenger-1.6.4 directory from the release directory
cd ../..
At this point you can run scavenger and it will make use of the test_data file to simulate mining on the dev.burst-test.net
Once you know it will run you will need to configure the config.yaml file to your setup. The config file itself is well commented and the GitHub Wiki has further information if required.
Additional notes
If the above steps were followed verbatim, all the scavenger files will be owned by root. It is not recommended to run as root so we will change the owner to a normal user, «burst» in this case. From the directory a level up from your scavenger-1.6.4 directory run:
chown -R burst:burst scavenger-1.6.4
This will recursively change ownership to the user «burst» for all files and subdirectories within the scavenger-1.6.4 directory.
to logout of root type:
exit
You are now back at the shell as your normal user (burst). You can now run scavenger by issuing the following command from the scavenger-1.6.4 directory:
./scavenger
Example output from running scavenger
Links
Software
https://github.com/PoC-Consortium/scavenger/releases/latest
GitHub Documentation
Development Library
BlockTalk
BlockTalk allows the user to write, debug, and deploy Burst smart contracts relying only on Java. You can use a simple text editor or your preferred IDE.
- Main Developer : jjos
- Download link : github.com/burst-apps-team/blocktalk
- Platform : Cross Platform
- More Information: See Documentation Section
Burstkit
BurstKit simplifies integrating with the Burst API for iOS devices. It provides wrappers for Burst API calls and implements Crypto utilities needed for key generation and signing.
- Main Developer:
- Download link : https://github.com/burst-apps-team/BurstKit
- Platform: Swift (iOS)
Burstkit4j
Burstkit4j is a BURST Java Development Framework.
- Main Developer : harry1453 (BAT)
- Download link : https://github.com/burst-apps-team/burstkit4j/releases
- Platform : Cross Platform, Java
@burstjs
A BURST JavaScript library to make it easier for developers to build apps using Angular/React/Node.js/JavaScript. The library is broken down into four packages:
- @burstjs/core
- @burstjs/crypto
- @burstjs/http
- @burstjs/util.
- Main Developer: blankey1337 (BAT) and Ohager (BAT)
- Documentation: https://burst-apps-team.github.io/phoenix/index.html
- Source Code: https://github.com/burst-apps-team/phoenix/tree/develop/lib
- On NPM: https://www.npmjs.com/search?q=burstjs
- Platform: Cross platform
BurstLib
BurstLib is a cross platform dynamic library to make developing applications and tools compatible with the Burst blockchain easier. Written in C++.
- Main Developer: Curbshifter
- Download link: https://github.com/CurbShifter/BurstLib/releases/tag/r16
- Platform: Windows, MacOS, Linux, Unix
Pool Software
babel-pool
- Main Developer: Originally by Harry1453, updated by jjos
- Download link: https://github.com/jjos2372/babel-pool
- Platform:
Features:
- Miners can set individually their share model
- Miners can set individually their donation fraction
- Miners can set individually their minimum payout
- Payouts by multi-out transactions with the current standard fee (variable)
- Support for multiple pool IDs (a primary and many secondaries)
dAPPS
CloudBurst
CloudBurst is a decentralized cloud storage application to upload & download files from the Burst blockchain.
- Main Developer: CurbShifter
- Download link: https://github.com/CurbShifter/CloudBurstDAPP/releases/latest
- Platform: Windows, MacOS
BurstCoupon
BurstCoupon allows you to create and claim password protected coupons as extension for the Burst blockchain.
- Main Developer: CurbShifter
- Download link: https://github.com/CurbShifter/BurstCoupon/releases/tag/1.19
- Platform: Windows, MacOS
The Burst dAppository
The place to shop for burst related projects.
- Main Developer:
- Download link: https://burst.dappository.world/
- Platform:
Explorer Apps
Burstcoin Explorer Mobile App
- Main Developer : harry1453
- Download link : https://github.com/harry1453/burstcoin-explorer-android/releases/latest
- Google Play: https://play.google.com/store/apps/details?id=com.harrysoft.burstcoinexplorer
- Platform : Android
Burstcoin explorer is a block explorer for the Burstcoin network
Features include:
- Search for and view blocks, accounts and transactions
- Keep a list of accounts you are watching
- Keep an eye on the current Burst price, both in BTC and USD
- Observe the current status of the Burstcoin Network
-
Countdown upcoming events such as the Pre-Dymaxion Hard Fork
foxy-proxy
A BHD, LHD, DISC, BOOM and BURST proxy which supports solo and pool mining upstreams
-
Main Developer : felix
-
Download link : https://github.com/felixbrucker/foxy-proxy/releases
-
Platform : Windows, Linux
Other Tools
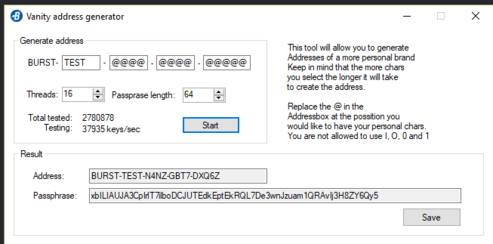
Vanity Address Generator
The vanity address generator is a tool for creating vanity or branded Burst account addresses. All address must have «BURST» for the first five leading characters. The capital letter «i» (I), the capital letter «o» (O), zero (0), and the number one (1) are not permitted. To generate a vanity address, enter characters into the form provided. Set the resources that should be used (number of CPU threads) and desired length of the passphrase.
The algorithm which seeks for the account with the desired string is a brute force algorithm, which checks every Burst account and passphrase combination sequentially. The time it takes to find a particular string increases significantly with every additional character. A string of 5 characters at the end takes approximately 4 minutes (more or less depending on computer resources). Each additional character increases the time required exponentially. A string of 8 would take approximately one hour. Longer strings could take weeks.
Burstcoin Explorer
Burstcoin explorer is a block explorer for the Burst network.
Features include:
- Search for and view blocks, accounts, and transactions
- Keep a list of accounts you are watching
- Keep an eye on the current Burst price, both in BTC and USD
- Observe the current status of the Burst Network
- Countdown upcoming events such as the Pre-Dymaxion Hard Fork
- Main Developer: harry1453
- Download link: https://github.com/harry1453/burstcoin-explorer-android/releases/tag/v1.4
- Platform: Android
Burst MemPool Monitor
Explore unconfirmed transaction on the Burst blockchain.
- Main Developer: MrPilotMan
- Download link: https://github.com/MrPilotMan/Burst-MemPool-Monitor
- Platform:
Archived
Burstpay Mobile Wallet - not currently supported - awaiting response from developer - please only use Phoenix mobile wallet at this time.
Mobile wallet for Android and iOS which provides the following features:
- Watch only addresses
- Currency conversion
- Client-side encryption and decryption
- Encrypted / Unencrypted transaction messages
- Contact book
- QR code support
- Secure and easy passphrase generation
- Support for over 15 languages
- Support for over 30 currencies
- Main Developer: iHashing Technology Co., Ltd.
- Download link: https://github.com/ihashing/BURSTPAY-mobile
- Platform: iOS, Android